Showing posts with label Rod building. Show all posts

Wednesday, 16 May 2012

Spiral guide placement

Jigging for cod and pollack is generally done with a multiplier type reel on a boat rod.  There is some additional comfort to be had if the reel seat is the trigger type.  On sea kayaks, we are often using short rods with a limited lift, which means the time taken for the lure to start sinking as we slacken the  line after a lift can result in a loop of slack line.  That slack line has a nasty habit of wrapping itself around your top guides.

While this isn't a problem when there's no fish, we all know what it's like to get hit by a big pollack unexpectedly.  The rod is practically wrenched from your hands and either you give it some line or hang to that rod for grim death!  If the line is wrapped around the tip and you can't give any line to that first dive of a big pollack, something will break.  Either the line, the rod tip, or worst of all, the rod itself gets pulled out of the your hands.
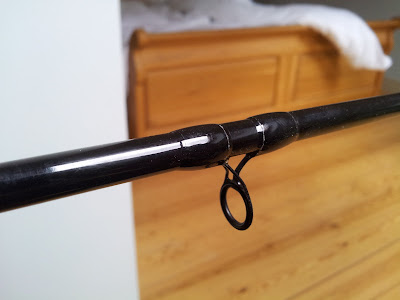
When a puppy like this hits your lure, you really don't want your line just at that moment to be tangled around your rod tip!  The rod in this photograph is the rod I chose to change to a spiral wrap.
So what can you do to minimise the risk of having a loop of line wrapped around your rod tip, impeding the release of line from the drag, just at the moment when a big pollack hits your lure?  One solution is to flip your rod upside down while you jig, so that all the rings are underneath.  But then you lose that direct contact with your reel and when a fish hits, you have to faff about swinging the reel round and start fighting the fish.

A better solution is to have a reel that is mounted upwards for access, so that your thumb can rest on the spool to add extra drag if needed and you can make use of the trigger grip, but to have the rod's guides mounted downwards to prevent loops of line being wrapped around the rod tip as you jig your lure.   For this to work, the line must twist around the blank, starting on top and ending up underneath it.

This is actually a lot less crazy than it sounds.  Generally there are two objections.  The first worry is that if the butt guide is off centre, then the line will build up during the retrieve on one side of the reel.  This isn't an issue.  Under tension in fact, as the photographs below show, the line pulls downward towards the centre of the ring rather than going over the side, therefore the amount of offset is less than you might think.  The second fear is  that it's a lot of work adjusting an existing rod, and you'll have to alter a whole lot of guides to get it to twist round gradually.  Actually the reverse is true.  You want to get that line underneath the rod as quickly as possible.  Unless you're actually using the rod for casting lures, then you can get the line underneath the rod in as little as two offset guides.

Spiral Guide Placement
The standard set up for a jigging rod from the kayak is an up-facing multiplier reel in a standard or trigger grip handle.  Bear in mind the method I'm showing here is not intended for a casting rod.  This a jigging rod, so the requirement for the smoothest possible transition of the line around the rod from the top to underneath isn't as critical as it might be.  A jigging rod simply has to let the lure sink, jig the lure, strike and land the fish!  Given the lures are often quite heavy for sea fishing, such as pirks, big shads, or butterfly jigs, the line should run out freely without any undue friction.  But as we'll see, switching the course of the line from top to bottom doesn't necessarily introduce any more friction than having guides all mounted in the same direction.

All that was a long winded way of saying I don't think you need to re-wrap more than the two lowest guides for a jigging rod (this is assuming a two piece rod).  A casting rod might need 3 or 4.  Of course, if you were doing a proper job, or building a rod like this from scratch, or you if have a one piece blank, then you should remove all the rings and re-wrap them.  Why?  Because any rod with the guides mounted facing upwards needs far more rings than the same rod if the rings are mounted downwards, as the former needs to keep the line off the blank when the rod is bent.  A rod with down facing guides doesn't have that problem, so the number of guides can be reduced saving a little weight and improving its looks.
Decide which guides you're going to re-wrap.  Start cutting across the guides with a secure razor blade or sharp knife, such as a craft knife or scalpel.

Chances are that the old wraps will come off quite neatly and any scratches you made to the blank should be covered by the new wraps.  Beware if your blank has a painted finish - be careful to to remove any paint from outside the areas covered by the thread.  You want to try and keep this job so that you can just varnish over the wraps and the rod will look the same as it did before.

Next move the top section of the rod so that all the guides face downwards.  Using some masking tape, try some offset positions with the rod loaded with a light weight.  Which side should the guides start their spiral?  Well I guess this may depend on how you hold your rod.  If you feel the twist in the line would be better going away from your arm, then start the offset on the opposite side.  I personally don't think the line gets in your way however you hold your rod, but you may feel differently.
The easiest way of trying to estimate the best offset position s is to look at where the line touches the bottom of the ring.  It should be plumb centre when under load.  You'll probably find that the butt guide barely moves the line position from where it was originally when not under load, and even under load, the line is only slightly off centre going towards the reel.  If you can keep it dead centre then do so.  This will mean the line build up on your reel will be exactly the same as it was before.  Generally you have to alter the line's route a little to one side starting with the butt guide, particularly if you're only using two rings to route the line under the rod.  Of course, if you have a level-wind reel none of this will worry you and you can fix the guide's offset position as you like!  

Once you're satisfied with the guide positions, wrap them in place.  If you're not sure how to do this, take a look at the series I did on renovating an old rod, full instructions and links to other guides are there.  I'd still test the guide positions before you apply the finish, just in case you're not happy with their offset position.  It's much easier to undo and re-wrap an unvarnished guide!
This is the finished rod after varnishing, taken from the side.  You can see the butt guide on the left offset about 50 degrees from the vertical, with the next guide set at about 100 degrees.  
By zooming into the above picture (apologies for the poor quality), you can see how under load the line sits at the base of the guide and when it reaches the reel it is pretty much central.
Now you could have simply divided 180 degrees by 3 and got your two offset angles (60 and 120). That might work equally well. However I wanted to make sure my line followed the best line for when the rod was under strain, and that means that the distance between the guides and the usual curvature of the rod have an effect of how the offset angle should be increased. After the eyes are whipped on, I start loaded the rod with heavier weights to see how the line sits in the guides as it transitions around the rod.  I try to have the line sitting plumb in the bottom of the ring under a medium to heavy load.  I'm not too bothered that the line may move around the outside edge of the guide under light loads (i.e. just lure weights), but when a fish is on I want maximum strength and stability.

The shots above shows the line sitting dead centre under load.  Apologies for the quality of the photos, I tried to use the brightest, heaviest strain line I had but even so it's a bit difficult to see in places.
The finish of the wraps perhaps isn't of the same standard as the factory, but it's perfectly acceptable for a kayak rod which in all honesty is only going to get hammered.  In fact, the new wraps stand out precisely because they are not yet scratched or scuffed!  While I doubt most people would even notice the guides had been re-wrapped from their looks - I'm sure fellow fishermen will raise an eyebrow at the guide positioning!

I'm pleased with the outcome of the re-positioning the guides.  I think it gives the best of both worlds: a rod that is less prone to the braid getting tangled up around the top guides during the slack line part of the "drop" while jigging, and a reel position that allows me to use the trigger grip as intended and apply some extra drag force to the spool with my thumb.  I really think this is the best solution for a jigging rod, and I can't see any reason why more rods are set up with spiral guide placements.

I'd be interested in any feedback you might have on this solution.  I've not seen it before in the UK, but I know spiral placements have been around for some time in the US.

Friday, 13 April 2012

6: Rod building - the finishing touches: varnish and lettering

Having finished your wraps, you're ready to varnish and add the finishing touches to the rod.  There are so many ways you can varnish the wraps, but most modern two-part epoxies will do a good job and the question is more whether you choose to apply a colour preserver beforehand to create bright, opaque colours or whether you want that more subdued, partially translucent look.  Personally I'm a fan of the latter, but for most purposes on a sea fishing rod, bright colours are considered the norm and because of the intense clear light at sea, you'll need a colour preserver if you don't want the threads to fade.  If you're varnishing the wraps for a fly rod to be used on a quiet trout stream somewhere, then subtle, translucent colours that often let the blank show through seem to be more appreciated.  It's your choice.

Applying a two-part epoxy finish, especially if it's a high build formula, has to be done carefully so as not to introduce bubbles.  Measure it out using two syringes, stir it as slowly as you can and apply it gently.  Sudden or "dabbing" movements with a brush will introduce those tiny bubbles that can be so difficult to get rid of.  Better by far to avoid bubbles in the first place than to be left messing about with flames trying to use heat to bring the bubbles up to the surface to get rid of them.

For this rod I used a medium-build epoxy, which is a half way house in terms of dealing with the dreaded bubbles.  It's thin enough for virtually all the bubbles to come out of their own accord without resorting to flames, but the downside is that you may find you need two applications to give an equivalent coating to the more common high-build formulas.  Once on, you'll need to keep rotating your rod 180 degrees every 20 mins for the first hour, then once an hour for four or five hours.  I'm not going into any more detail on applying an epoxy finish.  Other than dealing with the bubbles they are pretty straightforward to use and it seems a good finish can be obtained by most people.

Lettering

A much more fun part of the finishing process is writing the rod's casting weights, length and owner's name on the blank.  This is a bit more difficult than you might imagine.  Firstly, you are quite often dealing with a shiny black or near black blank.  Very few pens write on such a surface, and the ones that do generally have black ink.  It's true that if you have a very small gauge paint brush and an even, steady hand, you can paint the letters on.  I couldn't.  They ended up blotchy, uneven, unprofessional.  I don't mind a handmade look, but I don't like clumsy!  In terms of the metallic marker pens you sometimes see advertised for the job, my advice is to avoid them.  Unless you're using broomhandles for blanks, there isn't any on the market good enough (i.e. with a fine enough writing tip) for the job.

That leaves old fashioned dipping quills and opaque inks.  Dipping ink pens (nib plus holder) can be quite difficult to find, but once you've found them they are cheap.  I can strongly recommend dippennibs.co.uk, who sell both pen sets with nibs and holders, and they also sell a good range of opaque acrylic and metallic inks.  I wanted to get a really fine line for the writing on my blank, so opted for a fine mapping nib that comes with the Joseph Gillot set.
No. 659 "crow quill" in gunmetal blue is a rather fine piece of work:
The choice of ink is again up to you, your wrap highlights and the blank colour.  For dark colours, I prefer white or silver, but sometimes a copper or bronze colour can also look good.  For this rod I chose titanium white:
Whilst using the pen, try not to dip it past the "breathing hole".  You really need very little on the nib to write quite a few letters, particular as you're writing on a hard surface.  Before you start, you'll need to roughen the surface slightly so that the ink can grip and begin to flow from the nib.  I used some wet and dry that I'd smoothed right down by rubbing it together - it needs to be no more than matt, if you create any scratches, ink can flow down them and create a "leeched" effect.  You can erase any errors you make, but obviously the closer you get to the final letters, the more painful it is to start all over again!
Don't worry if the final thing isn't the prettiest up close.  Hold it a couple of feet away, and if it still looks OK then I'd just go with it.  You can see a few wobbles on my letters, but once you hold the rod away, you quickly realise how small the letters are that they actually look quite neat from a distance:
A coat of permagloss will deepen the contrasts and really make those white letters pop out at you.  If you really can't face writing the lettering on your rod, you can buy ready made up lettering decals  relatively cheaply, but I think a hand written inscription looks a lot nicer.  The last thing you want is for your rod to look factory made.  For me personally, if that's the look you're after then you're failing to appreciate what makes us individual and human.  Humans are not machines, and if you want a handmade rod then it should show the hand of its maker in some way.  Many rod builders add little touches to highlight the fact that the rod has been handmade, such as fancy wraps or patterned handles and the like.  Luckily I can rely on my shaky "old man's" hands!
So, there you have it.  The rod is finished and it's nearly time for the season to start (well, the cod fishing season at least - the sea bass are a few months off just yet!).  I'm pretty pleased with the results.  I've taken a rod that was only destined for the bin and rebuilt it into a nice looking rod, with the type of underarm, split grip EVA handle I've always wanted.  Moving the reel seat higher has given it a snappier action to work surface lures and it has better guides, lighter but also bigger (No. 8) that can pass a small egg snap through the tip to make finishing for the day easy.  Off with the plug and just reel in!  Of course, on a sea kayak the rod will get inevitably get trashed again as it really is the toughest environment bar none, but hopefully the quality of my finish and the materials I've chosen will outlast those of Orvis (who to be fair weren't making a rod specifically for sea kayak fishing).  Below is the original rod from Orvis, or at least what it quickly became after two seasons, and below that how it's been transformed this winter!  Apologies for the quality of the final two photos.  If I get time I'll put some better ones up.


I've one more rod building project to share with you, which is converting a rod with a trigger grip that leaves the rod guides facing upwards, to one more suitable for jigging that has the guides facing downwards.  Basically you re-wrap the guides in a spiral from the bottom guide up!

Hopefully I'll get that started soon enough to beat the start of the season...

until then, tight lines.

Monday, 5 March 2012

5: Rod Building - Wrapping the guides.

In the last article on rod building, I covered placing the guides according to the new guide concept.  Once you're happy with the position of your guides, it's time to get whipping!  (or "wrapping" if you prefer).

If you remember, my handle was finished in black EVA with red trim rings:
So I now want to follow that theme with a simple black wrap with a red trim.  Simplicity itself, though even here you can have several options: should the trim be in a metallic red?  Should the trim be single or double?  Perhaps a simple turn of a single thread might look better?  When you're unsure of how a colour scheme will turn out, the only way to solve it is do some practice wraps.

First job is to prepare the guide feet.  All guides when they come are fairly crudely finished.  If you try to whip a guide foot that hasn't been tapered, you'll end up with a ugly step in your whipping, quite possibly with the guide foot showing through.  The shot below shows an unprepared foot:
You can see that you would never get your thread to smoothly mount that guide foot.  So either get some heavy gauge wet-and-dry paper, a chainsaw file or a standard very fine metal file or a sharping stone.  Anything really, as your only taking a tiny bit off the foot to give a nicer gradient for the thread to mount:
Keep checking that the foot lies flat against the blank and that the chamfer goes right to the blank and is as gentle in gradient as you can be bothered to make it.  The more gradual it is the better your wrap will look, but it doesn't matter on a large size guide if there's a bit of bump.

Once you're happy, you're ready to wrap.  I'd advise you to have several goes at this if it's your first time.  Don't feel too precious about cutting it all off and trying a different colour scheme.  The more you practice the easier you'll find it.

As I want a narrow band of red at the end of the whip, I generally put my pull through loops onto the blank in advance of starting the wrap using a bit of masking tape.  Apologies for the quality of the photos - my old camera phone wasn't the best at close ups:
I next tie in the red thread that make up the trim band,  again fixing it with tiny pieces of masking tape:
Once both of those are attached to the blank with tape, I start my main wrap colour.  In my case it's plain black.  The hardest part in starting is to form the initial "X" where your wrap thread crosses over the end of the thread.  As you wind, you can sometimes find that even after several turns, your wrap rotates as you turn your rod.  To stop this happening, make your crossover X as usual, then keep wrapping  the end of the thread around your rod in the opposite direction to your wrap thread.  Do half a dozen turns.  Now start turning the rod and let your wrap thread cover the end thread.  Pull the end thread as you go, it will turn the rod in the right direction, eventually it will come up against the wrap thread and you can't pull it any more.  You can now trim it off and keep winding your wrap thread over the end.  It sounds a lot more complicated than it is - I promise you!  

I've put together a series of step by step pictures on how to whip a female spigot joint below which shows this in more detail - if you follow the steps you should find it easy to master the start of wrap neatly and consistently.

Keep winding your wrap thread until you get within 10-15 turns of the end of the guide foot.  Tie in your loop and finish the wrap as usual.  Now go back and do the trim wrap.  Wind the trim thread a few turns (less is generally considered better) and put the end through the original loop that was fastened with masking tape.  Pull tight, trim the thread a few millimeters from the end, and pull the loop through.  You'll probably be left with a few ends to trim with a razor or craft knife.  Be careful here - very easy to try and cut too close and nick the underlying wrap, which means re-doing the lot!

The final wrap will looking something like this (this was one of my colour tests):
Don't worry if it looks a bit rough in places with gaps, you can smooth those out by rubbing it with your finger nail or smooth thin round piece of plastic.  Go gently, it's very easy to loosen a thin trim band at the end of the wrap, with the inevitable result!


Starting the wrap

To make the process of a basic wrap a bit clearer, I've included a step by step photo shot of wrapping the female spigot joint.  This is exactly the same process as above, but with better photos!

Start by taping on your trim band thread. Make sure you have enough for a few turns!

Tape on your  pull-through loop for the band.  The main wrap loop can be tied in later.
Now start your main wrap thread.  Create an 'X' and then wrap the end thread round the rod in the opposite direction half a dozen turns or so.  Now you can pull on that and it will turn the rod, wrapping it as it goes until there are no more turns left of the end thread and it comes up against the turns of the wrap.  This makes it easy to start the wrap.

Now trim the end thread.  You can go much closer than this.

Continue the wrap until about 6-8 turns from the end, then tie in your pull-through loop.  Finish the wrap and start trim band.  Tie this off using the loop you put in earlier, or you can insert one immediately you start the band, though with very narrow bands this makes for a weak finish.


Final wrap.  You can move it about and tidy up any gaps, but be very gentle with either end, if it goes loose you 'll need to do the whole lot again!

Repeat for the remaining rings.  It's not a quick process - I'd expect it to take a few evenings if it's your first effort.


Tight lines to those fishing.


Wednesday, 22 February 2012

4. Rod Building - Choosing and spacing rod guides

After finding the spline, perhaps the next most contentious subject in rod building is the best way to space rings given the length and type of rod, and even the type of ring itself.  I'm working with a spinning rod, so it's relatively straightforward to follow one of the many guide charts out there.  However, there are so many variants I was at first stuck on which to choose.  I settled on the  New Guide Concept, which I think works pretty well and was formulated with spinning rods in mind.

After you've glued on the handle of your rod and its tip eye (tip top), mount the reel you will use on the rod.   New Guide Concept uses the diameter of the spool to determine the placement of what is termed the "choke" guide.  The choke guide is the first of the small diameter rings that lead to the eye.  Where this method differs from the traditional approaches is that the rod rings do not reduce in diameter to match the taper of the rod.  Instead, there is a set of guides ("running guides") after the tip eye that all have the same diameter.  These are the smallest eyes on the rod, and the first of these looking from the handle end is called the "choke" guide.

There is a very nice guide you can follow hosted on rodbuilders.org in their library section that explains the concept in more detail that I do here.  But in brief, order the size of rings that match your typical line strength in mono.  Roughly:

  • 10lb mono or less = size 6
  • 10lb to 14lb = size 8
  • 15lb mono or above = size 10.

How many do you need?  Again the rule of thumb is length in feet of your rod plus one, plus your tip top.  So for a 7ft rod get 8 guides plus a tip eye.  But how many running guides to get, plus the reducers?  Generally, for medium rods you'll need around 3 guides between the reel and the choker.  So for the 7ft rod in our example, that makes 5 running guides, 3 reducers and a tip eye.  Before ordering measure the diameter of the rod tip with a set of callipers to check you won't get a tip eye too small.

But there is a fair bit of wiggle room in guide selection, half foot rod sizes are up to you and you should also take into account the length of handle (i.e. how far up the rod your reel sits).  For example I've designed my rod for working top lures and soft plastics, so I have the reel as far up the rod as I can reasonably make it.  Under the New Guide Concept this has an effect, as it pushes the choke guide up the rod in proportion, so you may need fewer rings.  However rings are relatively cheap and lightweight, so I'd order too many rather than too few.

First take the spool diameter in millimetres using a set of digital callipers.
   
Take this measurement and multiply it by 27 to give you the distance to the choker guide.  Measure it in a straight line from the centre of the spool to the guide.  It helps to lay the rod on the floor to do this.

Tape the choke guide on at the distance given by your spool measurement.  Then just divide the distance equally from there to the tip eye to match the number of running guides you bought.

Tape them up and check their alignment.  Then space the descending rings from the butt ring to the choke guide evenly (though this distance is likely to be larger than that for the running guides.

The next test is unspool some line from your reel and check that the line follows the curve of the rod evenly.  And that's it!  Job done.

In the next article in the series we'll look at guide preparation and how to whip (or wrap) them to the rod.


Monday, 30 January 2012

3. Rod Building - Finding the spline and varnishing the blank

Finding the spline and making use of it is probably something that most anglers need never concern themselves with.  Rod builders seem to make a great fuss about it, but whether you believe it makes a difference to the rod performance or not, it remains a part of the rod building process that most rod builders still carry out and align their reel seats and rings accordingly.  There are two popular beliefs out there, one stating that a casting rod should have its rings to the inside of the spline, and one that spinning rods should have theirs to the outside.  Tom Kirkam has suggested that on a spinning rod, rod stability is entirely determined by the rings and subsequent line pressure on the bottom of the rings, and that any spline effect is negligible.  That said, and even though I totally concur with his views, I still went through the process of finding the spline!
Roll the blank around to feel its side of greatest resistance.
On a three piece rod the spline effect is probably even less pronounced, as it probably won't be felt at all in the bottom section.  What I do is work my way down from the top section, mark the top side (most resistance), adding the sections and rotating them to check the overall spline is still in agreement with the top section.  It's a bit hit and miss, and depending on the quality of your blank there may be no precise or definitive point for the spline.  But there's generally an eighth of a turn or so in which you can identify it.

Once you have that, I assemble the rod and then remove all traces of the markings and wipe the rod down with U40 Brush Cleaner to get rid of any grease.  It's surprising how much graphite dust clings to the fibres of a blank if you've received it unvarnished or have cleaned up an old one as in my case:
My next task was to glue on the tip eye ring (tip top).  I like to do this as it gives you some kind of back up that you've not messed up somehow with the spline when you come to positioning the rest of the rings on the rod.  You can simply align the tip eye to the reel seat:
 Once that has set, you're ready to varnish.  I use Permagloss.  It's a polyurethane varnish that seems very tough with a high gloss finish.  Apparently it also makes a bulletproof finish for wraps too, the only downside is that each wrap would require a minimum of five coats, so I guess most folk prefer a single high build application.  I will give the rod three coats: two as undercoats, with the second rubbed down to remove any bubbles or uneveness in the finish.  The final coat goes on after the wraps.
If you're doing a multi-section rod, don't forget to leave a gap between the sections for wear.  No point in the female joint rubbing and sticking over a layer of varnish.

Next job is to position the rings - I'll be posting soon on the method I used.

Tight lines.

Thursday, 12 January 2012

2. Rod Building - Glueing the handle together

On the second  of the rod building articles, I'll show you how CRB split handle kits from Mudhole are glued together.  You'll need some 2-part epoxy glue and something to wipe the excess glue away with.  Rubbing alcohol is recommended by some - I use a rag with some brush cleaner for epoxy finishes on it, but you obviously need to use this sparingly.

The kits make the process relative straightforward.  Having everything pre-drilled for a 16mm carbon tube is obviously quicker than reaming out the interior diameter hole of EVA or cork grips to the correct size and taper of the rod blank.  Once you have the handle assembled, it's then a relatively simple process of mounting the whole lot onto your blank.
As it comes, everything has to be glued up, even the Fuji reel seat whose front grip creates the down-tightening split-grip handle.  I used a fast setting glue (ProBond).
Make sure you put all the winding checks in place (loose) before you start glueing any handles.  Note that winding checks have direction...

You should also mark the end of the tube where the butt cap comes against.  This lets you first glue the rear EVA handle in place and then glue the butt cap up against it.
First job is put the handle components together and slide them down the blank to find out where the EVA handle hole matches the rod blank.  If by luck that's more or less the right place for you, then you can go ahead and mark it on the blank.  If not you'll need to make that hole slightly bigger.  It shouldn't be too tight, otherwise over time the rotation of the EVA against the rod blank will mark whatever finish you put on it.  Make sure the reel seat is screwed down to its smallest setting, but don't screw it so hard it moves the EVA sleeve off the reel seat.  You can then check the length of the mounting tube to see if needs cutting down to length (if it does, you'll need a very fine tooth saw or even better, an electric mitre saw with a fine tooth blade).  I was lucky - it was pretty much bang on.

Once you're satisfied with the placement and tube length, then you can go ahead and glue the top half of the split handle onto the Fuji reel seat.  Don't forget to put the the trim ring on first, then smear it with glue, then push down onto the ring.  You will probably find a good deal of glue is pushed up against the edge of the EVA handle, which will then glue the trim ring.  Once you've got them glued, you can start making the reel seat arbours.  I use masking tape, as I'm cheap and lazy, and because it works!

As you can see the reel seat is right at the end of the mounting tube.  You want a snug rather than a tight fit - too tight and you won't get it on over the glue, or worse, it rubs off most of the glue as you push it on.  You can then either glue up the rest of the handle components except the butt cap, or mount the tube on the blank and glue them up afterwards, the choice is yours.  I used three arbours for the tube, but to be sure you might want to make that four.  To be honest there isn't much flexing going at the bottom of this blank and the tube is very stiff given its length.

Finally there's just the fiddly bit of glueing the winding checks up against the EVA handles and then you're done:
Finished handle, cleaned up from excess glue and looking quite nice.
So would I recommend the CRB Split Handle kits from Mudhole?  Yes, I would.  It's an easy way to start.  I probably won't buy another, as I don't really like the idea of adding a carbon tube on top your existing blank and for future projects I'll go directly to the blank.  You save weight, you have a direct contact to the blank, and I think it looks better.  But the CRB handle kits are super quick and easy to do - literally an hour's work and your done, and the result is pretty good.

Next article in this series, I talk a little about finding the rod spine, and Fuji's concept guide system for guide placement.  Tight lines until then.
Related Posts Plugin for WordPress, Blogger...